
“`html
Proven Fix: How to Fix a Flat Tire
Don’t let a flat tire leave you stranded! This guide provides a clear, step-by-step method for safely changing a flat tire, empowering you to handle this common roadside issue with confidence. We’ll cover everything from gathering your tools to safely reattaching your spare.
Contents
- 1 The Dreaded Pssssst: Why Flat Tires Happen and What to Do
- 2 Gather Your Essential Tire-Changing Toolkit
- 3 Step-by-Step Guide: How to Safely Change a Flat Tire
- 4 Important Considerations for Driving on a Spare Tire
- 5 When to Call for Professional Help
- 6 Frequently Asked Questions (FAQs) About Changing a Flat Tire
The Dreaded Pssssst: Why Flat Tires Happen and What to Do
We’ve all been there. You’re cruising along, music playing, enjoying your drive, and then you hear it – that tell-tale hissing sound. A flat tire. It’s a frustrating and sometimes anxiety-inducing moment, especially if you’ve never dealt with one before. But take a deep breath! Knowing how to fix a flat tire is a fundamental skill for any driver, and it’s not as daunting as it might seem.
Flat tires are a common occurrence, often caused by sharp objects on the road like nails or glass, underinflated tires leading to damage, or even issues with the tire valve. While calling for roadside assistance is always an option, being able to handle it yourself can save you time, money, and give you a real sense of accomplishment. This guide is designed for beginners, breaking down the process into simple, manageable steps. We’ll walk you through everything you need to know to get back on the road safely.
Ready to conquer that flat tire? Let’s get started!
Gather Your Essential Tire-Changing Toolkit
Before you even think about touching that flat tire, you need to make sure you have the right equipment. Thankfully, most vehicles come with a basic tire-changing kit. It’s crucial to know where these items are stored in your car before you have a flat. Check your trunk, under the cargo floor, or sometimes in a side compartment. Having these ready will make the process much smoother.
What You’ll Need:
- Spare Tire: Ensure it’s properly inflated and in good condition. A donut spare is smaller and intended for temporary use, while a full-size spare is ideal.
- Jack: This is the tool that lifts your car. Familiarize yourself with how it operates – most are screw-type or scissor jacks.
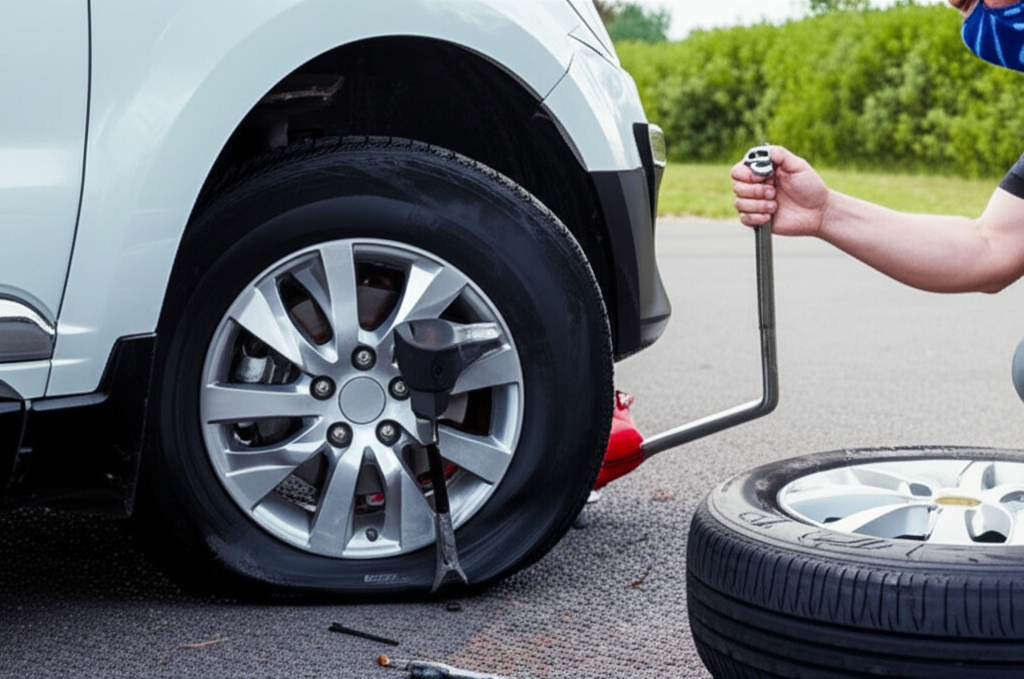
- Lug Wrench: This L-shaped tool is used to loosen and tighten the lug nuts that hold the wheel in place.
- Vehicle Owner’s Manual: This contains specific information about your car, including the proper jacking points and tire pressure recommendations.
- Gloves (Optional but Recommended): Keep your hands clean and improve your grip.
- Wheel Chocks or Bricks (Optional but Highly Recommended): These prevent your car from rolling while it’s lifted.
- Flashlight (If it’s dark): Essential for visibility.
- Tire Pressure Gauge: To check the pressure of your spare tire.
Pro Tip: Regularly check the air pressure in your spare tire, just like you do with your regular tires. A flat spare won’t do you much good!
Step-by-Step Guide: How to Safely Change a Flat Tire
Changing a flat tire might seem intimidating, but by following these steps carefully, you can do it safely and efficiently. Remember, safety is paramount. If you ever feel unsure or unsafe, don’t hesitate to call for professional help.
Step 1: Find a Safe Location
The very first thing to do when you realize you have a flat is to find a safe place to pull over. Look for a level, stable surface, well away from traffic. A parking lot or a wide shoulder is ideal. Avoid soft ground or inclines, as this can make jacking the car unstable.
Why it’s important: A stable, level surface is critical for safely operating the jack. If the car is on an incline or soft ground, the jack could slip, causing serious injury or damage.
Step 2: Turn on Hazard Lights and Engage Parking Brake
Once you’ve found a safe spot, turn on your hazard lights. This alerts other drivers to your presence. Then, firmly engage your parking brake. If your car has a manual transmission, put it in first gear or reverse. For automatic transmissions, put it in “Park.”
Why it’s important: Hazard lights make you visible to other vehicles, reducing the risk of an accident. The parking brake and gear selection prevent the car from rolling while you’re working on it.
Step 3: Chock the Wheels (Optional but Recommended)
If you have wheel chocks or even sturdy rocks or bricks, place them firmly against the wheel diagonally opposite to the flat tire. For example, if your front right tire is flat, chock the rear left tire. Place one in front and one behind the wheel.
Why it’s important: This provides an extra layer of security against the car rolling, especially if you’re on even a slight incline. It adds stability while the car is lifted.
Step 4: Loosen the Lug Nuts
Before you lift the car, use the lug wrench to loosen the lug nuts on the flat tire. Turn them counter-clockwise. You might need to use a bit of force. If they’re really tight, you can try standing on the wrench handle (carefully!) or using your foot. Loosen them about a half-turn to a full turn – just enough to break them free, but don’t remove them yet.
Why it’s important: Loosening the lug nuts while the tire is still on the ground prevents the wheel from spinning freely once the car is lifted, making it much easier to remove them.
Step 5: Position the Jack and Lift the Vehicle
Consult your owner’s manual to find the correct jacking point for your vehicle. These are reinforced areas on the car’s frame designed to support the weight. Place the jack under the designated spot. Slowly and steadily operate the jack to raise the vehicle until the flat tire is completely off the ground, with enough clearance to remove it and install the spare.
Why it’s important: Using the correct jacking point ensures you don’t damage your car’s body or frame. Lifting the car high enough is essential to allow the flat tire to be removed and the inflated spare to be put on without rubbing against the ground.
Step 6: Remove the Lug Nuts and the Flat Tire
Now that the tire is off the ground, you can fully unscrew the lug nuts you loosened earlier. Keep them together in a safe place, like your pocket or a hubcap, so you don’t lose them. Once all the lug nuts are removed, grip the flat tire firmly and pull it straight towards you to remove it from the wheel studs. Lay the flat tire on its side under the vehicle, near the jack, as an extra safety precaution.
Why it’s important: Removing the lug nuts completely allows the wheel to be detached. Placing the flat tire under the car acts as a safety buffer; if the jack were to fail, the car would land on the flat tire instead of the ground, potentially preventing further damage or injury.
Step 7: Mount the Spare Tire
Lift the spare tire and align the holes in the wheel with the wheel studs on the car. Push the spare tire onto the studs as far as it will go. This can sometimes be a bit tricky, so take your time to get it seated properly.
Why it’s important: Proper alignment of the spare tire ensures it sits flush against the hub, which is crucial for stability and safe driving.
Step 8: Hand-Tighten the Lug Nuts
Put the lug nuts back onto the studs and tighten them by hand as much as you can. It’s best to tighten them in a star or criss-cross pattern. This helps to seat the wheel evenly against the hub.
Why it’s important: Hand-tightening ensures the lug nuts are started correctly and helps to center the wheel. Tightening in a star pattern distributes pressure evenly, preventing the wheel from becoming warped or unevenly seated.
Step 9: Lower the Vehicle and Tighten Lug Nuts with Wrench
Slowly lower the vehicle using the jack until the spare tire is firmly on the ground, but before the full weight of the car is on it. Now, use the lug wrench to tighten the lug nuts securely, again using the star pattern. Once they are snug, lower the car completely. With the car’s full weight on the tire, give the lug nuts one final, firm tightening with the lug wrench.
Why it’s important: Lowering the car partially allows you to tighten the lug nuts with leverage without the wheel spinning. Tightening them fully once the car is on the ground ensures they are secure and the wheel is firmly attached.
Step 10: Stow Equipment and Check Tire Pressure
Put the flat tire, jack, and lug wrench back into their proper storage locations in your vehicle. Don’t forget to remove your wheel chocks if you used them! If you have a tire pressure gauge, check the pressure of the spare tire. Most spare tires require a higher pressure than regular tires – check the sidewall of the spare or your owner’s manual for the correct PSI.
Why it’s important: Properly stowing your equipment keeps your car organized and ensures you have everything for the next time. Checking the spare tire’s pressure is vital for safe driving and to prevent further issues.
Important Considerations for Driving on a Spare Tire
You’ve successfully changed your tire! Great job! However, it’s important to remember that most spare tires, especially the smaller “donut” spares, are temporary solutions. They have limitations and require careful driving.
Driving Safely on a Spare Tire:
- Speed Limits: Most donut spares have a maximum speed rating, often around 50 mph (80 km/h). Driving faster can be dangerous and damage the spare.
- Distance: These temporary spares are not designed for long-term use. They typically have a limited mileage range (often around 50-70 miles).
- Handling: You might notice a difference in how your car handles, steers, and brakes. Drive cautiously and avoid sudden maneuvers.
- Avoid Heavy Loads: Don’t carry heavy cargo or tow anything while using a temporary spare.
- Get Your Flat Tire Repaired or Replaced ASAP: As soon as possible, visit a tire shop to have your original tire inspected, repaired if possible, or replaced.
Always refer to the sidewall of your spare tire or your vehicle’s owner’s manual for specific limitations and recommendations.
Here’s a quick comparison of common spare tire types:
| Spare Tire Type | Description | Pros | Cons |
|---|---|---|---|
| Full-Size Spare | Matches your regular tires in size and type. | Can be driven at normal speeds and for longer distances; handles like your regular tires. | Takes up more trunk space; needs to be maintained like a regular tire. |
| Compact Spare (Donut) | Smaller and narrower than a regular tire; often has a lower speed rating. | Takes up less space; lighter than a full-size spare. | Limited speed and mileage; can affect car’s handling and ABS/traction control systems. |
| Temporary Use Tire (often found on newer vehicles) | Similar to compact spares but may have even more restrictive speed and mileage limits. | Very compact; lightweight. | Severely limited use; often requires immediate replacement of the flat tire. |
When to Call for Professional Help
While this guide provides the steps to change a tire yourself, there are situations where calling for roadside assistance or a tow truck is the safer and smarter choice:
- Unsafe Location: If you cannot find a safe place to pull over, do not attempt to change the tire yourself.
- Missing Equipment: If your car is missing a jack, lug wrench, or a usable spare tire.
- Stuck Lug Nuts: If the lug nuts are seized and won’t budge even with significant force.
- Physical Limitations: If you have a physical condition that makes lifting or using tools difficult or unsafe.
- Bad Weather: In severe weather conditions like heavy rain, snow, or ice, it’s often safer to wait for professional help.
- Damage to Wheel or Studs: If you notice that the wheel studs are broken or the wheel itself is damaged.
Remember, your safety is the top priority. Organizations like AAA (American Automobile Association) or your vehicle’s roadside assistance program can be invaluable resources.
Frequently Asked Questions (FAQs) About Changing a Flat Tire
Q1: How do I know if my spare tire is properly inflated?
A: You can check the inflation pressure of your spare tire using a tire pressure gauge. The recommended PSI is usually printed on the sidewall of the spare tire itself or can be found in your vehicle’s owner’s manual. Most spare tires, especially compact ones, require a higher inflation pressure than standard tires, often around 60 PSI.
Q2: Can I drive on a flat tire?
A: No, you should never drive on a completely flat tire. Driving on a flat tire will quickly damage the tire beyond repair, and can also cause significant damage to your vehicle’s wheel rim, suspension, and brakes. If you notice a tire is losing air rapidly, pull over immediately and change it or call for assistance.
Q3: How tight should I make the lug nuts?
A: You should tighten the lug nuts as firmly as you can with the lug wrench after the car is lowered. Using a star or criss-cross pattern ensures even pressure. While you don’t need a torque wrench for an emergency roadside change, aim for a solid, secure feel. It’s a good practice to have a mechanic check the torque with a proper wrench soon after, especially if you used a compact spare.
Q4: What if the lug nuts are too tight to loosen?
A: If the lug nuts are extremely tight, you can try using your foot to apply more force to the lug wrench, but be very careful not to slip. Sometimes, a bit of penetrating oil can help, but this is usually not practical roadside. If you absolutely cannot loosen them, it’s safer to call for professional roadside assistance rather than risk injury or damaging the wrench or lug studs.
Q5: How long can I drive on a spare tire?
A: This depends on the type of spare. Compact or “donut” spares are meant for temporary use only, typically for a limited distance (often around 50-70 miles) and at reduced speeds (usually under 50 mph). Always check the sidewall of your spare or your owner’s manual for specific limitations. Driving beyond these limits can be dangerous and damage the spare.
Q6: Do I need to replace the lug nuts when I change a tire?
A: Generally, no. You can reuse the same lug nuts unless they appear damaged (stripped threads, cracks, etc.). It’s important to put them back on correctly and tighten them securely. If you suspect any damage to the lug nuts, it’s best to replace them.