
Essential Oiling: Power tools thrive on regular lubrication! For most common power tools, oiling every 3-6 months or after heavy use is a good rule of thumb. Always check your tool’s manual for specific recommendations to ensure optimal performance and longevity.
Ever stared at your trusty power drill or circular saw and wondered, “Does this thing need oil?” You’re not alone! Keeping your tools in top shape can feel like a mystery, and oiling is often one of those tasks people aren’t quite sure about. But here’s the good news: it’s much simpler than you might think, and a little bit of attention can go a long way in keeping your gear running smoothly for years. We’ll break down exactly when and how to oil your power tools, so you can get back to your projects with confidence.
Contents
- 1 Why Oiling Your Power Tools is Crucial
- 2 How Often Should Power Tools Be Oiled? The General Guidelines
- 3 Decoding Your Tool’s Manual: The Ultimate Guide
- 4 Types of Lubricants for Power Tools
- 5 How to Oil Common Power Tools: A Step-by-Step Approach
- 6 Specific Tool Maintenance: Oiling Needs by Tool Type
- 7 When NOT to Oil Your Power Tools
- 8 Troubleshooting Common Oiling Issues
- 9 The Importance of a Clean Tool Environment
- 10 Understanding Power Tool Warranties and Lubrication
- 11 Frequently Asked Questions (FAQ)
Why Oiling Your Power Tools is Crucial
Think of oil as the lifeblood of your power tools. Inside, gears, bearings, and other moving parts are constantly working against each other. Without proper lubrication, these metal components rub together, creating friction. This friction does a few unwelcome things:
- Causes Wear and Tear: Friction generates heat, which can degrade metal parts over time, leading to premature wear.
- Reduces Efficiency: Increased friction means your tool has to work harder to do its job, consuming more power and performing less effectively.
- Leads to Overheating: Excessive friction can cause components to overheat, potentially damaging them beyond repair.
- Invites Rust and Corrosion: Moisture can get into exposed parts, and without a protective layer of oil, rust can quickly set in, especially in humid environments.
- Increases Noise: You might notice your tools becoming louder as parts wear down due to lack of lubrication.
Regular oiling combats all these issues, ensuring your tools operate efficiently, quietly, and reliably. It’s a simple preventative maintenance step that saves you money and frustration in the long run.
How Often Should Power Tools Be Oiled? The General Guidelines
This is the million-dollar question, and the honest answer is: it depends! However, we can establish some solid general guidelines. For most common handheld power tools used by DIYers and homeowners, a good starting point is:
- Every 3-6 Months: This is a great baseline for tools that see regular, but not heavy, use. Think of it as a seasonal check-up.
- After Heavy Use: If you’ve just completed a big project that pushed your tools to their limits, it’s a good idea to give them a quick oiling afterward. This is especially true for tools like reciprocating saws, demolition hammers, or sanders that generate a lot of heat and vibration.
- Before Long-Term Storage: If you’re putting a tool away for several months, oiling it first helps protect the internal components from moisture and seizing up.
It’s important to remember that these are general recommendations. The best advice will always come from the manufacturer. Always, always consult your tool’s owner’s manual for the most accurate and specific lubrication schedule.
Decoding Your Tool’s Manual: The Ultimate Guide
Your tool’s manual is your best friend when it comes to maintenance. Manufacturers design their tools with specific lubrication needs in mind. Here’s what to look for:
- Lubrication Schedule: Many manuals will explicitly state how often a tool should be oiled or greased.
- Type of Lubricant: They’ll specify whether to use light machine oil, grease, or a specialized lubricant. Using the wrong type can do more harm than good.
- Oiling Points: The manual will often show diagrams indicating exactly where the oil needs to be applied – usually specific ports or access points.
- Disassembly Instructions: For deeper maintenance, the manual might include steps on how to safely disassemble parts to access internal lubrication points.
Don’t have your manual? No problem! Most manufacturers have their manuals available for download on their websites. A quick search with your tool’s model number should lead you right to it.
Types of Lubricants for Power Tools
Not all lubricants are created equal. Using the right type is crucial for effective lubrication and preventing damage.
Here’s a breakdown of common lubricants you might encounter:
| Lubricant Type | Common Uses | Key Benefits | When to Use |
|---|---|---|---|
| Light Machine Oil (e.g., 3-in-One Oil, sewing machine oil) | Drill chucks, gears in some drills and sanders, pivot points, general lubrication. | Penetrates well, reduces friction, prevents rust. | For lighter-duty tools or specific points indicated in the manual. |
| Gear Oil (EP Lubricants) | Heavy-duty gearboxes in drills, impact wrenches, angle grinders. | Handles high pressure and load, provides excellent wear protection. | For tools with enclosed, high-torque gear systems. |
| Lithium Grease (White Lithium Grease) | Bearings, gear housing, sliding parts, often found in cordless tool gearboxes. | Stays in place, provides long-lasting lubrication, water-resistant. | For components that require a thicker, more persistent lubricant. |
| Silicone Lubricant/Spray | Rubber seals, plastic parts, preventing sticking. | Protects rubber, reduces friction on non-metal parts, doesn’t attract dust. | For specific applications like lubricating rubber O-rings or preventing plastic components from binding. |
Important Note: Never use WD-40 as a primary lubricant. While it’s a fantastic penetrating oil and water displacer, it evaporates quickly and doesn’t offer long-lasting lubrication. Using it as a substitute for proper oil can actually lead to increased wear over time.
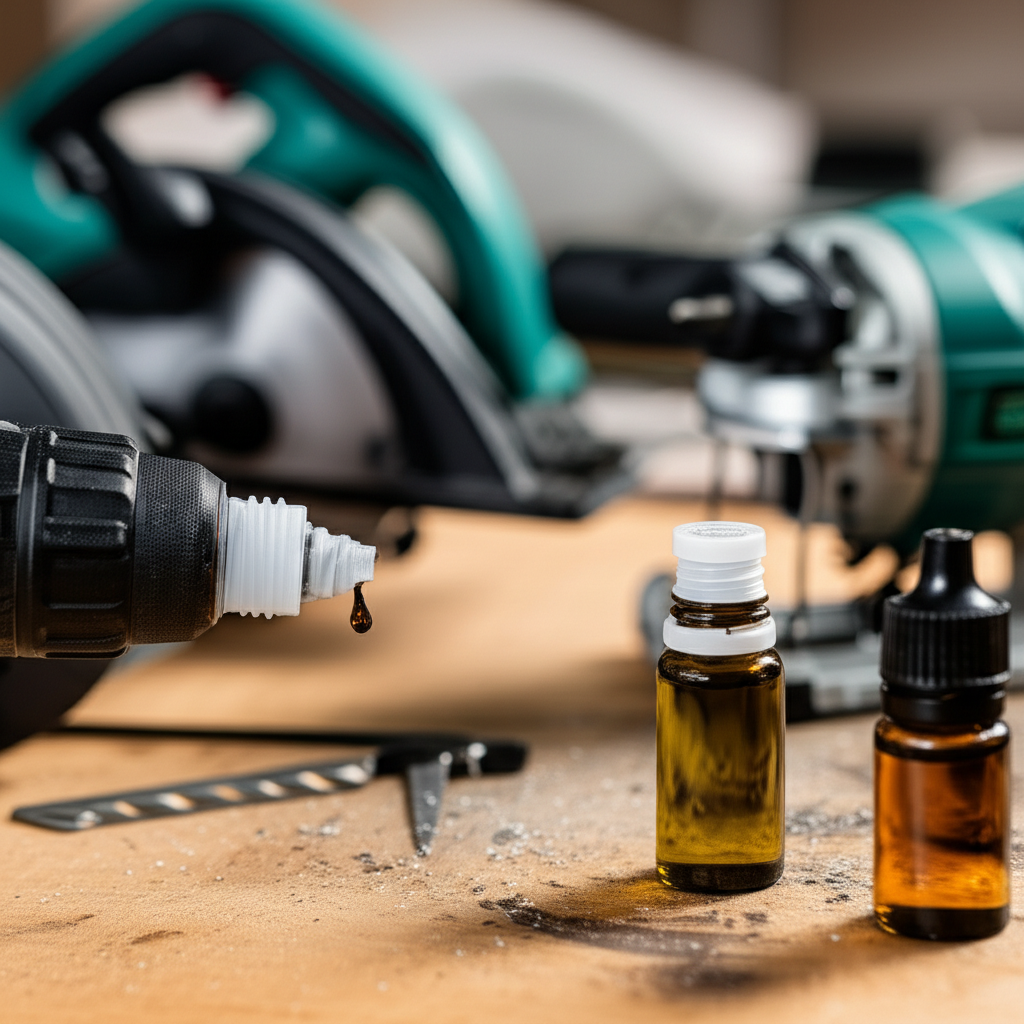
How to Oil Common Power Tools: A Step-by-Step Approach
The process of oiling your tools can vary slightly depending on the tool type, but the general principles remain the same. Always start by ensuring the tool is unplugged or the battery is removed for safety!
1. Preparing Your Workspace and Tool
- Safety First: Unplug the tool from the power outlet or remove the battery pack. This is non-negotiable.
- Cleanliness is Key: Wipe down the exterior of your tool with a clean, dry cloth. Remove any dust, dirt, or debris. If there’s visible grime around lubrication points, use a slightly damp cloth (not wet!) and ensure the area dries completely before proceeding.
- Gather Your Supplies: You’ll need your chosen lubricant (as specified by the manual), a clean cloth, and possibly a small brush or cotton swab for precise application.
2. Locating Lubrication Points
This is where your manual is invaluable. However, here are some common areas to check:
- Gear Housing: Many tools have a small port or plug on the gear housing where oil or grease is applied.
- Chuck (for Drills/Impact Drivers): The chuck mechanism, especially on corded drills, might have a small opening for oiling.
- Bearings: Some tools have accessible bearings that require a drop of oil.
- Pivot Points: Hinges or pivot points on tools like jigsaws or oscillating multi-tools might need a touch of lubricant.
- Cooling Vents: While not for direct oiling, ensure vents are clear. Sometimes, light oil can be applied to motor brushes if accessible, but this is less common and often requires specific instructions.
3. Applying the Lubricant
This is where a gentle touch is important.
- For Light Machine Oil: Apply just a drop or two directly to the lubrication point. Over-oiling can attract dust and gunk up the works.
- For Grease: Use a small amount, typically applied with a brush or cotton swab, ensuring it coats the gears or bearing surfaces without excessive build-up.
- For Chucks: A few drops of light oil are usually sufficient. Work the chuck open and closed a few times to distribute the oil.
4. Distributing the Lubricant
After applying the lubricant, it’s essential to help it spread throughout the moving parts.
- Manual Operation: For drills, chucks, or tools with manual adjustments, operate the mechanism several times.
- Brief Power-Up (Use Caution!): For tools like drills or sanders, you can briefly (just a second or two) run them at a low speed without any load. This helps distribute the oil through the gears. Make sure the area is clear and you’re holding the tool securely.
- Work it In: For grease, gently rotating gears by hand or with a tool can help spread the grease evenly.
5. Cleaning Up
Wipe away any excess lubricant with a clean cloth. This prevents dust and debris from sticking to the oily parts and making a mess.
Specific Tool Maintenance: Oiling Needs by Tool Type
While the general principles apply, some tools have unique lubrication requirements.
Cordless Drills and Impact Drivers
These are workhorses, and their gearboxes are often sealed units. Many cordless tools use grease, not oil, inside the gearbox.
- Gearbox: Check your manual. Some models have a grease port. If not, it might involve partial disassembly to access and replenish grease in the gear housing. This is often a task for less frequent maintenance (e.g., annually or if you hear grinding).
- Chuck: A few drops of light machine oil on the chuck mechanism itself (where the bits insert) can keep it opening and closing smoothly.
- Chuck Screw: Some chucks have a small screw on the side that, when removed, allows access for a bit of oil.
Circular Saws
These powerful tools have robust gear systems.
- Gear Housing: Look for a lubrication port, often near the blade or on the motor housing. Your manual will specify the type of lubricant (usually gear oil or heavy grease) and the amount.
- Arbor: A tiny dab of grease on the blade arbor (the shaft the blade mounts onto) can prevent the blade from seizing.
- Blade Guard Pivot: A drop of light oil on the pivot point of the blade guard ensures it moves freely.
Angle Grinders
Angle grinders are subjected to high speeds and loads, making proper lubrication vital.
- Gear Housing: Most angle grinders have a dedicated lubrication port for their gearboxes. Again, consult your manual for the correct type of grease or gear oil and the recommended quantity. Overfilling can cause overheating.
- Spindle Lock Button: Ensure this button moves freely; a tiny bit of light oil can help if it’s stiff.
Jigsaws and Reciprocating Saws
These tools have intricate internal mechanisms.
- Blade Clamp/Holder: A small amount of light oil applied to the mechanism that holds the blade can prevent it from sticking.
- Pivot Points: Any joints or pivot points on the tool’s body or blade arm can benefit from a drop of light oil.
- Gearbox: Some models may have specific lubrication points for their gearboxes, usually detailed in the manual.
Sanders (Orbital, Belt)
Sanders have bearings and sometimes gear systems that need attention.
- Bearings: If your sander has accessible bearings (e.g., where the sanding pad or belt rollers attach), a small amount of light oil or grease might be appropriate, as per the manual.
- Gearbox: Some sanders have enclosed gearboxes that may require periodic greasing, similar to drills.
When NOT to Oil Your Power Tools
It’s just as important to know when not to apply lubricant.
- Electric Motors: The motor itself is usually sealed and self-lubricating or requires no user lubrication. Applying oil to motor vents can gum up the motor and cause it to overheat.
- Switch Mechanisms: Oiling electrical switches can cause short circuits or create a sticky mess.
- Plastic Parts: Unless specified by the manual (e.g., for preventing sticking), avoid oiling plastic components.
- Areas Prone to Dust Accumulation: Oiling surfaces where dust and debris will readily stick can create a grinding paste, doing more harm than good.
- If the Manual Says No: This is the golden rule. Some tools are designed with self-lubricating components or sealed units that require no user intervention.
Troubleshooting Common Oiling Issues
Even with the best intentions, you might run into minor hiccups.
- Tool is Stiff/Sticky: This is usually a sign that lubrication is needed. Apply a small amount of the correct lubricant to the relevant points and work the mechanism.
- Excessive Noise: Grinding or squealing noises often indicate a lack of lubrication in the gear train. Follow the manual’s instructions for oiling or greasing the gearbox.
- Overheating: While many things can cause overheating, excessive friction from dry parts is a common culprit. Ensure all moving parts are properly lubricated.
- Rust Spots: If you notice small rust spots, clean them off with a fine steel wool or rust remover, then apply a thin coat of oil to the affected area to prevent recurrence.
The Importance of a Clean Tool Environment
Lubrication works best when your tools are clean. Dust, sawdust, metal shavings, and grime can all interfere with lubrication and even create abrasive compounds when mixed with oil or grease.
Make it a habit to:
- Wipe down your tools after each use.
- Blow out dust and debris from vents and crevices with compressed air (wear safety glasses!).
- Store your tools in a clean, dry place, preferably in their original cases or toolboxes.
A clean tool is a happy tool, and it will respond much better to its lubrication routine.
Understanding Power Tool Warranties and Lubrication
It’s worth noting that improper maintenance, including incorrect or neglected lubrication, can sometimes void a manufacturer’s warranty. Always adhere to the maintenance schedule and lubricant recommendations outlined in your owner’s manual to ensure your warranty remains valid. If you’re unsure about a specific maintenance task, it’s often better to consult a professional or the manufacturer than to risk damaging your tool and voiding the warranty.
For example, organizations like the Occupational Safety and Health Administration (OSHA) emphasize the importance of proper machine maintenance, which includes lubrication, as a key aspect of workplace safety and tool longevity. While OSHA focuses on industrial settings, their principles of preventative maintenance are highly relevant for any power tool user.
Frequently Asked Questions (FAQ)
Q1: How often should I oil my cordless drill?
For most cordless drills, the gearbox is often sealed and uses grease. It’s not typically an “oiling” task done every few months. Check your manual; some may have a grease port for periodic replenishment (e.g., annually or if you notice issues). However, the chuck mechanism (where the drill bit goes) can benefit from a drop or two of light machine oil every few months or if it feels stiff. Always ensure the battery is removed before oiling the chuck.
Q2: Can I use any oil for my power tools?
No, it’s crucial to use the type of lubricant recommended by your tool’s manufacturer. Common lubricants include light machine oil (like 3-in-One), gear oil, and white lithium grease. Using the wrong type, like WD-40 as a primary lubricant, can lead to premature wear because it doesn’t provide lasting lubrication. Always refer to your owner’s manual for specific recommendations.
Q3: My tool is making a grinding noise. What should I do?
A grinding noise often indicates a problem with the gears, likely due to a lack of lubrication or worn-out parts. First, ensure the tool is unplugged or the battery is removed. Then, consult your manual to locate the gearbox lubrication points. Apply the recommended lubricant. If the noise persists after proper lubrication, it might indicate internal damage, and it would be best to have the tool inspected by a
Hi, I’m Jake Carter. I’m passionate about everything on wheels and the tools that keep them running. From keeping cars spotless to testing the latest power tools, I love sharing practical tips that help drivers, DIYers, and enthusiasts get more out of their machines. On AMZTechHub, I cover everything from car washing and maintenance to power tool guides and workshop advice—making it simple for anyone to keep their ride and their gear in top shape.