
Effortless grout removal without power tools is achievable with the right manual tools and techniques, focusing on precision and patience to protect your tiles and minimize dust.
Dealing with old, stained, or damaged grout can feel like a daunting task, especially if you’re not keen on using noisy power tools. Many homeowners worry about chipping tiles or creating a huge mess when tackling grout removal. But what if I told you there’s a way to get that grout out cleanly and efficiently, all by hand? It’s true! You don’t need a hefty grinder or a noisy oscillating tool to get the job done right. This guide will walk you through simple, effective methods using basic tools, ensuring a satisfying result without the hassle or risk associated with power equipment. Let’s dive into how you can achieve a refreshed tile surface, one careful stroke at a time.
Contents
- 1 Why Go Tool-Free for Grout Removal?
- 2 Essential Manual Tools for Grout Removal
- 3 Step-by-Step Guide to Effortless Grout Removal
- 4 Tips for Maximizing Efficiency and Minimizing Effort
- 5 When to Consider Other Options (Even Though We’re Tool-Free!)
- 6 Comparison of Manual Grout Removal Tools
- 7 Maintaining Your Tools
- 8 The Importance of Proper Grout Removal for Regrouting
- 9 Frequently Asked Questions (FAQ)
Why Go Tool-Free for Grout Removal?
There are several compelling reasons why opting for manual grout removal might be the best choice for your next DIY project. For starters, it’s significantly safer, especially for beginners. Power tools, while fast, can be unforgiving. A slip of the wrist can lead to chipped tiles, damaged surfaces, or even personal injury. Manual methods allow for much greater control, giving you the confidence to work precisely around your tiles.
Another major advantage is the reduction in dust and noise. Power grinders create a significant amount of airborne silica dust, which is a serious health hazard and requires extensive protective gear and cleanup. Manual tools produce far less dust, making the work environment cleaner and healthier. Plus, you can say goodbye to the loud, disruptive noise that often accompanies power tool usage, which is a big win if you have neighbors or live in an apartment building.
Cost-effectiveness is also a key factor. The tools required for manual grout removal are generally inexpensive and readily available at any hardware store. This means you can achieve professional-looking results without investing in costly power equipment. It’s a budget-friendly approach that doesn’t compromise on quality.
Finally, for those with sensitive or older tiles, manual removal is often the gentlest option. It minimizes the risk of cracking or dislodging tiles that might be less securely adhered. This careful approach is crucial for preserving the integrity of your existing tile work.
Essential Manual Tools for Grout Removal
To tackle grout removal effectively without power tools, you’ll need a few key items. Think of these as your trusty sidekicks in the battle against old grout. Each tool plays a specific role in making the process smooth and efficient.
The Grout Saw: Your Primary Weapon
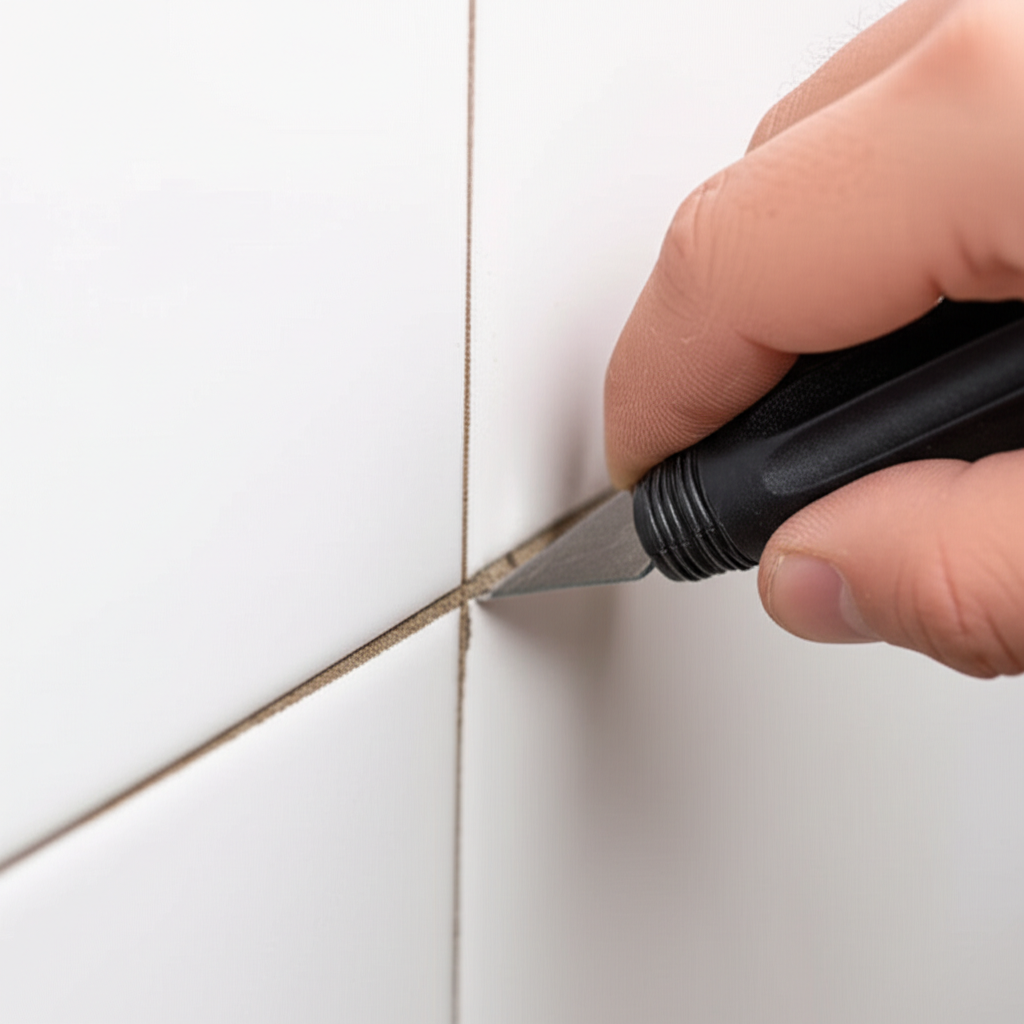
The undisputed star of manual grout removal is the grout saw. These are specialized hand tools designed specifically for this job. They typically feature a thin, sturdy blade with sharp, serrated edges. The design allows you to get right into the grout lines and saw away the old material.
- Blade Material: Look for blades made from hardened steel or carbide. These materials are durable and hold their sharpness well.
- Blade Shape: Some grout saws have straight blades, while others have slightly curved or angled blades. A slightly curved blade can sometimes make it easier to maneuver around corners or tight spots.
- Handle Comfort: Since you’ll be doing a lot of sawing, a comfortable, ergonomic handle is a must. It reduces hand fatigue and improves your grip.
Putty Knife or Chisel: For Stubborn Spots
While the grout saw is great for most of the work, you might encounter areas where the grout is particularly hard or deep. In these cases, a stiff putty knife or a small chisel can be very helpful. Use them carefully to chip away at the remaining grout, especially near the edges of tiles.
- Putty Knife: A stiff, flexible putty knife with a pointed tip can be used to pry out loosened grout.
- Chisel: A small, sharp chisel, ideally one designed for tile or masonry work, can be used with a light tap from a hammer to break up stubborn grout. Always use a chisel with caution to avoid damaging the tiles.
Scrub Brush: For Cleaning Up
Once the bulk of the grout is removed, you’ll need a brush to clean out the remaining dust and debris from the grout lines. A stiff-bristled scrub brush or even an old toothbrush can work well for this.
Safety Gear: Don’t Forget This!
Even without power tools, safety is paramount. Always wear:
- Safety Glasses: To protect your eyes from any flying debris.
- Gloves: To protect your hands from abrasion and potential cuts.
- Dust Mask: While manual removal creates less dust, it’s still wise to wear a mask, especially if you’re sensitive to dust or working in a poorly ventilated area.
Other Helpful Items
- Bucket of Water: For rinsing your tools and cleaning up.
- Rags or Sponges: For wiping down surfaces.
- Drop Cloths: To protect your floors from dust and debris.
Step-by-Step Guide to Effortless Grout Removal
Now that you have your tools ready, let’s get down to business. Follow these steps for a smooth and effective grout removal process.
Step 1: Prepare Your Workspace
Before you start sawing, it’s crucial to prepare the area. This will save you a lot of cleanup time later.
- Lay down drop cloths or old newspapers over your floors and any nearby surfaces to catch falling grout and dust.
- Ensure good ventilation in the room, especially if you’re using any cleaning solutions or if the old grout has a musty smell. Open windows or use fans.
- Gather all your tools and safety gear so they are within easy reach.
Step 2: Start Sawing the Grout Lines
This is where the magic happens. Grab your grout saw and start working on the grout lines.
- Position the grout saw blade directly into the center of a grout line.
- Apply steady, firm pressure and begin to saw back and forth. The serrated blade will cut through the grout.
- Work slowly and deliberately. The goal is to remove the grout without touching or damaging the edges of your tiles.
- Focus on removing about two-thirds to three-quarters of the grout depth. You don’t need to go all the way to the backer board.
- As you work, periodically pull the saw out to clear away loose grout and dust. You can use a brush or a quick puff of air (be careful not to inhale!) for this.
Step 3: Address Stubborn Grout
Sometimes, the grout might be particularly hard or deeply set. Don’t force the saw too much, as this can lead to breakage or tile damage.
- If the grout saw is struggling, try using a sharp chisel and a hammer. Place the tip of the chisel at an angle into the grout line and gently tap the end of the chisel with the hammer.
- Work in small sections, chipping away at the stubborn grout. Always aim to direct the force away from the tile edge.
- A stiff putty knife can also be useful for prying out grout that has already been loosened by the saw.
Step 4: Clean Out the Grout Lines
Once you’ve removed the majority of the grout from a section, you need to clean out the lines thoroughly.
- Use your stiff-bristled brush or an old toothbrush to sweep out the loose grout dust and debris from the lines.
- You can use a vacuum cleaner with a brush attachment for a more thorough cleaning, but be careful not to scratch the tiles.
- A damp sponge or cloth can be used to wipe down the tiles and remove any remaining dust. Ensure the grout lines are clean and dry before proceeding to regrouting.
Step 5: Inspect and Repeat
After cleaning, inspect the grout lines. If there are any remaining patches of old grout, repeat the sawing or chiseling process as needed.
- Pay close attention to corners and edges to ensure they are clean.
- Once you’re satisfied that all the old grout is removed and the lines are clean, you’re ready for the next step – likely regrouting!
Tips for Maximizing Efficiency and Minimizing Effort
Working with manual tools requires a bit of technique to make the process as efficient as possible. Here are some tips to help you work smarter, not harder.
- Work in Sections: Don’t try to do the entire room at once. Tackle one small area at a time. This makes the task feel less overwhelming and allows you to maintain focus and energy.
- Maintain a Consistent Angle: When using the grout saw, try to maintain a consistent angle relative to the tile surface. This helps prevent the blade from digging into the tile.
- Use Leverage Wisely: For the grout saw, use the tile edge as a slight fulcrum if needed, but be extremely careful not to apply pressure that could chip the tile. The tool is designed to cut the grout, not pry against the tile.
- Keep Tools Clean: Grout dust can build up on your tools. Periodically clean your grout saw blade and brush to maintain their effectiveness. A quick wipe with a damp cloth usually does the trick.
- Take Breaks: Manual labor can be tiring. Don’t hesitate to take short breaks to rest your hands and eyes. Staying hydrated also helps maintain energy levels.
- Consider Grout Type: Some grout types are harder than others. Sanded grout is generally harder than unsanded grout. Be prepared to adjust your technique slightly based on the grout you’re removing.
When to Consider Other Options (Even Though We’re Tool-Free!)
While this guide focuses on manual methods, it’s worth knowing when the situation might call for a different approach. For very large areas, extremely hard grout, or if you’re on a very tight deadline, power tools might be more practical. However, for most DIYers tackling a bathroom or kitchen backsplash, manual removal is perfectly suitable and often preferred for its control and safety.
If you find yourself struggling significantly with manual removal, it might indicate an unusually durable grout or perhaps a very old installation where the grout is almost fused with the tile. In such rare cases, a powered grout removal tool (like an oscillating multi-tool with a grout blade) could speed things up, but always proceed with extreme caution and proper safety gear.
Comparison of Manual Grout Removal Tools
To help you choose the right manual tools, here’s a quick comparison:
| Tool | Pros | Cons | Best For |
|---|---|---|---|
| Grout Saw | Precise, controlled removal; minimal dust; inexpensive; easy to use. | Can be slow for large areas; requires physical effort; blades can wear out. | Most grout removal tasks, especially for beginners and those prioritizing tile safety. |
| Putty Knife/Chisel | Effective for stubborn or deep grout; good for tight corners. | Requires careful handling to avoid tile damage; can create more dust than a saw if not used properly. | Targeted removal of stubborn spots after using a grout saw. |
| Stiff Brush | Excellent for cleaning out dust and debris from lines. | Not effective for removing grout itself. | Post-removal cleaning. |
Maintaining Your Tools
To ensure your manual grout removal tools last and perform well, a little maintenance goes a long way:
- Clean After Each Use: Rinse grout saws and brushes thoroughly with water to remove all grout residue.
- Dry Thoroughly: Before storing, make sure your tools are completely dry to prevent rust, especially on metal blades.
- Store Properly: Keep your tools in a dry place. If you have replacement blades for your grout saw, store them safely.
- Replace Worn Blades: Grout saw blades are consumables. When you notice it becoming dull and harder to cut, it’s time for a replacement. Continuing to use a dull blade will increase your effort and risk damaging tiles.
The Importance of Proper Grout Removal for Regrouting
Why is removing old grout so critical before applying new grout? It’s all about ensuring the new grout adheres properly and creates a durable, long-lasting seal.
- Adhesion: New grout needs a clean, solid surface to bond to. Any leftover old grout, dust, or debris will create a weak bond, leading to premature failure of the new grout.
- Depth: The grout lines need to be deep enough to accept the new grout. If you leave too much old grout, the new grout won’t penetrate sufficiently, making it prone to chipping or cracking. You typically want to remove at least 2/3 of the grout depth.
- Appearance: Clean, uniformly removed grout lines ensure a neat and professional appearance for your new grout job. Uneven removal will result in an uneven new grout line.
- Preventing Mold/Mildew: Old, deteriorated grout can harbor mold and mildew. Complete removal helps eliminate these issues and provides a fresh start.
For more information on best practices in tiling and grout work, the Ceramic Tile and Stone Industry offers valuable resources and standards.
Frequently Asked Questions (FAQ)
Q1: How long does manual grout removal typically take?
A1: The time it takes for manual grout removal can vary significantly depending on the size of the area, the condition of the grout, and your pace. For a small bathroom floor or a kitchen backsplash, you might expect it to take anywhere from a few hours to a full day. Working in small, manageable sections and taking breaks can make the process more enjoyable and less strenuous. Patience is key; rushing the process can lead to mistakes and tile damage.
Q2: Can I use a utility knife to remove grout?
A2: While a very sharp utility knife might work for very soft or damaged grout in small patches, it’s generally not recommended as your primary tool. Utility knife blades are thin and can break easily, posing a safety risk. They also lack the specific design and durability needed to effectively cut through most grout types without excessive force or risk to your tiles. A dedicated grout saw is a much safer and more effective option.
Q3: What’s the best way to remove grout from around delicate or antique tiles?
A3: For delicate or antique tiles, extreme caution is advised. Always opt for manual removal methods. A grout saw is the preferred tool because it offers the most control. If you encounter very hard grout, consider using a very small, sharp chisel with minimal tapping from a hammer, or even just the putty knife to gently scrape away loosened material. Test your method on an inconspicuous area first to ensure it doesn’t damage the tile surface or edges.
Q4: How deep do I need to remove the grout?
A4: You generally need to remove about two-thirds to three-quarters of the depth of the old grout. This ensures that the new grout has enough space to create a strong bond and will sit flush with the tile surface. You don’t need to remove grout down to the subfloor or backer board. Removing too much can weaken the tile’s adhesion. Aim for a consistent depth across all grout lines for the best results.
Q5: Is it okay to get the tiles a little wet while removing grout?
A5: A slightly damp cloth or sponge can be useful for wiping away dust and debris from the tile surface as you work, which can improve visibility and prevent dust from spreading. However, you don’t want to saturate the area. Excessive water can make the grout mushy and harder to remove cleanly, and it can also seep into the grout lines, potentially affecting the adhesive beneath the tiles over time. Keep the area as dry as possible while actively removing grout.
Q6: My grout saw isn’t cutting through the grout easily. What should I do?
A6: If your grout saw is struggling, several factors could be at play. First, check if the blade is dull; grout saw blades are consumables and will wear out. If it’s dull, replace the blade. Second, ensure you are applying steady, firm pressure. Third, the grout itself might be particularly hard or bonded tightly. In this case, try using a small, sharp chisel with very light taps from a hammer, focusing on breaking up the grout rather than prying against the tile. Alternatively, try a different grout saw with a carbide-coated blade, which is generally more aggressive.
Q7: What is the general lifespan of a grout saw blade?
A7: The lifespan of a grout saw blade depends on several factors, including the hardness of the grout, the amount of grout you’re removing, and the quality of the blade itself.