
Pilot drilling into concrete is surprisingly straightforward with the right tools and technique. This guide breaks down the process into simple steps, ensuring clean, accurate holes every time, making your concrete drilling projects effortless and efficient.
Drilling into concrete can feel like a daunting task, especially if you’re new to it. You might worry about damaging your tools, creating messy holes, or even causing cracks in the concrete itself. But here’s the good news: with a few key tips and the right approach, pilot drilling concrete is a skill anyone can master. It’s all about understanding the process and using the appropriate gear. We’ll walk you through it, step by step, so you can confidently tackle your next concrete drilling project. Get ready to make this job feel easy!
Contents
- 1 Why Pilot Drill Concrete?
- 2 Essential Tools for Pilot Drilling Concrete
- 3 Choosing the Right Drill Bit Size
- 4 Step-by-Step Guide: How to Pilot Drill Concrete
- 5 Tips for Effortless Concrete Pilot Drilling
- 6 Troubleshooting Common Issues
- 7 When to Use a Rotary Hammer vs. a Hammer Drill
- 8 Safety Standards and Resources
- 9 Frequently Asked Questions (FAQs)
Why Pilot Drill Concrete?
Before we dive into the “how,” let’s quickly touch on the “why.” Pilot drilling is essentially creating a smaller, guide hole before drilling the main, larger hole. This is especially crucial when working with tough materials like concrete. Think of it as prepping the surface. It makes the main drilling much easier, more accurate, and significantly reduces the risk of damaging the concrete. It’s a small step that saves a lot of hassle and ensures a professional finish.
Essential Tools for Pilot Drilling Concrete
Having the right tools is half the battle when it comes to drilling concrete. For pilot drilling, you’ll want to gather a few key items. Don’t worry, you likely have some of these already, and the others are worthwhile investments for any DIYer or contractor.
- Hammer Drill or Rotary Hammer: This is your primary tool. A standard drill won’t cut it for concrete. Hammer drills use a hammering action combined with rotation to break up the concrete as they drill. Rotary hammers are even more powerful, using a piston mechanism for a more aggressive, efficient hammer action. For pilot holes, a good hammer drill is usually sufficient, but a rotary hammer will make the job faster, especially for multiple holes or harder concrete.
- Masonry Drill Bits: These are specifically designed for drilling into hard materials like concrete, brick, and stone. They have a carbide tip that is much harder than standard drill bits. For pilot holes, you’ll want a smaller diameter masonry bit, typically ranging from 3/16 inch to 1/2 inch, depending on the size of your final hole.
- Measuring Tape and Pencil/Marker: For marking the exact spot where you need to drill. Accuracy is key, especially for pilot holes that guide larger fasteners or anchors.
- Safety Glasses: Non-negotiable! Concrete dust and debris can fly, and protecting your eyes is paramount.
- Dust Mask: Drilling concrete creates fine dust, some of which can be harmful if inhaled. A good quality dust mask will keep your lungs clear.
- Work Gloves: To protect your hands from abrasion and provide a better grip on the drill.
- Hearing Protection: Hammer drills and rotary hammers can be loud. Earplugs or earmuffs are recommended for extended use.
- Vacuum Cleaner (with HEPA filter if possible): To clean up dust as you go, which helps with visibility and safety.
- Water Spray Bottle (optional but recommended): A little water can help cool the drill bit and reduce dust.
Choosing the Right Drill Bit Size
The size of your pilot hole is directly related to the size of the fastener or anchor you plan to use. A good rule of thumb is to drill a pilot hole that is about half the diameter of the fastener you’re using. For example, if you’re using a 1/4-inch anchor, a 1/8-inch pilot hole is a good starting point. Always check the manufacturer’s recommendations for the specific anchor or screw you are installing, as they will specify the required pilot hole size.
Here’s a quick reference table for common anchor sizes and suggested pilot hole diameters:
| Anchor/Screw Diameter | Suggested Pilot Hole Diameter |
|---|---|
| 3/16 inch (5mm) | 3/16 inch (5mm) |
| 1/4 inch (6mm) | 1/4 inch (6mm) |
| 5/16 inch (8mm) | 5/16 inch (8mm) |
| 3/8 inch (10mm) | 3/8 inch (10mm) |
| 1/2 inch (12mm) | 1/2 inch (12mm) |
Important Note: This table is a general guideline. Always refer to the fastener manufacturer’s specifications for the most accurate pilot hole size. Using a pilot hole that is too small can make it difficult to insert the fastener and may even damage the concrete. A pilot hole that is too large will not provide adequate grip for the fastener.
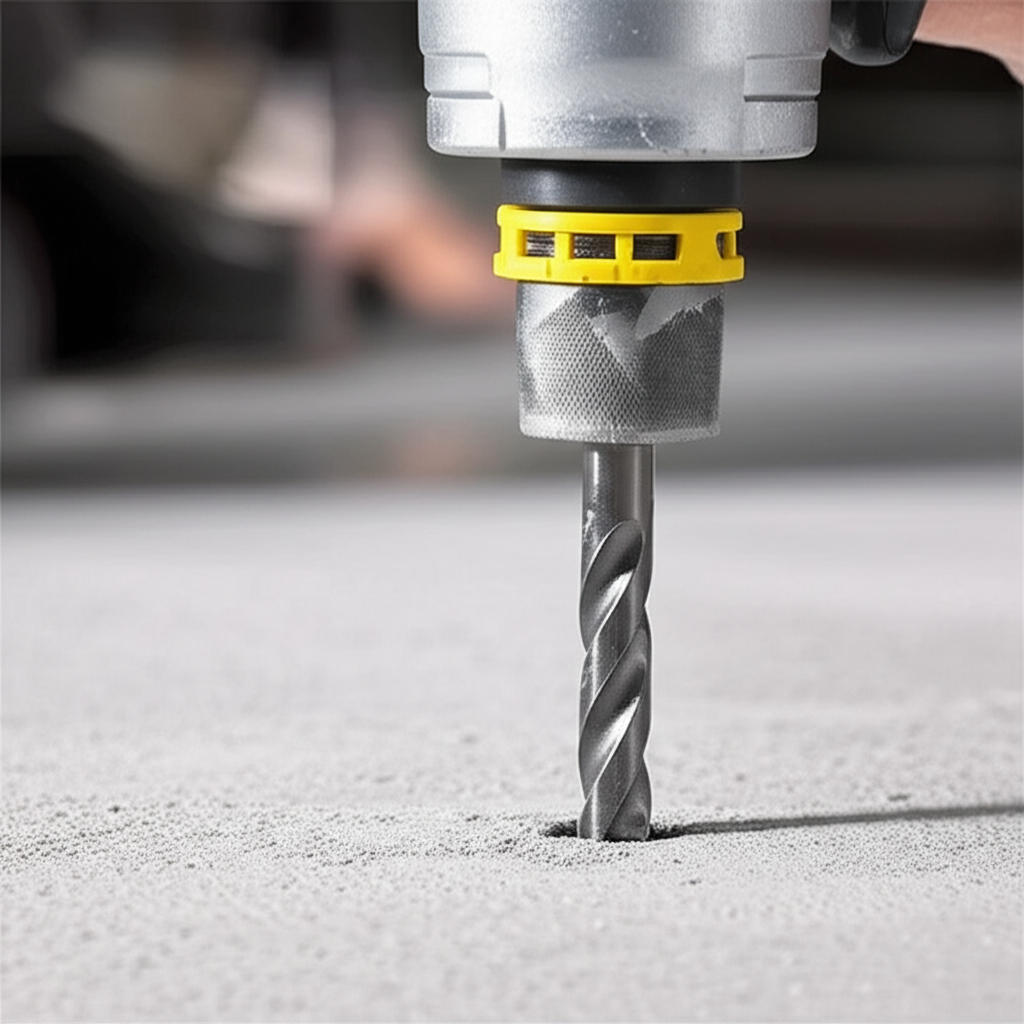
Step-by-Step Guide: How to Pilot Drill Concrete
Now that you have your tools and know your bit size, let’s get drilling! Follow these steps carefully for a successful pilot hole.
Step 1: Safety First!
Before you even pick up the drill, put on your safety gear. This includes safety glasses, a dust mask, and work gloves. If you’re using a powerful hammer drill or rotary hammer, consider ear protection too. Make sure your work area is clear of debris and well-ventilated.
Step 2: Mark Your Spot
Use your measuring tape and pencil or marker to accurately mark the exact center of where you need the pilot hole. Double-check your measurements. If you’re drilling multiple holes, ensure they are spaced correctly according to your project’s requirements.
Step 3: Set Up Your Drill
Insert the chosen masonry drill bit into the chuck of your hammer drill or rotary hammer. Ensure it’s securely tightened. If your drill has different modes, make sure it’s set to the “hammer drill” or “rotary hammer” setting, not just standard drilling. For a pilot hole, you typically don’t need the highest speed setting; a medium speed is often best.
Step 4: Position the Drill
Place the tip of the drill bit directly on the mark you made. Hold the drill perpendicular to the concrete surface. It’s crucial to keep the drill as straight as possible. Any angle can lead to an off-center hole or a bit that binds.
Step 5: Start Drilling
Begin drilling at a slow speed to create a small indentation. This helps prevent the bit from “walking” or slipping across the surface. Once you have a slight divot, increase the speed slightly. Apply steady, firm pressure. Let the drill do the work; don’t force it. The hammering action of the drill will help break up the concrete.
Step 6: Manage Dust and Heat
As you drill, dust will be created. Periodically pull the drill bit back slightly (while it’s still spinning) to clear the dust from the hole. This also helps cool the bit. If you have a spray bottle, a quick spritz of water into the hole can further reduce dust and keep the bit from overheating, which can dull it faster. Be cautious with water and electricity – ensure your drill is properly rated for wet conditions if you choose this method.
Step 7: Drill to the Correct Depth
Most drill bits have depth markings on them, or you can wrap a piece of colored tape around the bit to indicate your desired depth. For pilot holes, you usually want to drill to the depth recommended by the anchor or fastener manufacturer. This is often slightly deeper than the length of the fastener itself to ensure it has room to expand or seat properly.
Step 8: Withdraw the Bit
Once you reach the desired depth, maintain pressure and slowly withdraw the drill bit while it’s still spinning. This helps clear the hole of any remaining debris. You should now have a clean, precise pilot hole.
Step 9: Clean the Hole
Use your vacuum cleaner to remove any remaining dust from the hole. A clean hole is essential for the anchor or fastener to grip properly. You can also use a small brush or compressed air if available.
Tips for Effortless Concrete Pilot Drilling
Here are some extra tips to make your pilot drilling experience as smooth and effortless as possible:
- Use Sharp Bits: A dull masonry bit will make the job much harder, take longer, and increase the risk of overheating. Invest in good quality bits and replace them when they show signs of wear.
- Don’t Force It: Let the hammer action of the drill do the work. Forcing the drill can damage the bit, the drill, or the concrete.
- Maintain Perpendicularity: Always keep the drill bit straight and perpendicular to the surface.
- Clear Debris Regularly: Pulling the bit out periodically while drilling helps remove dust and debris, making drilling faster and easier.
- Consider a Depth Stop: Many hammer drills come with a depth stop rod. This attaches to the drill and allows you to pre-set the maximum drilling depth, ensuring consistent results without needing to eyeball it.
- Start Slow: Always begin drilling at a slower speed to create a starting point and prevent the bit from wandering.
- Cooling the Bit: For longer drilling sessions or very hard concrete, a little water can significantly extend the life of your drill bit and make drilling easier. Use with caution and ensure your equipment is suitable.
Troubleshooting Common Issues
Even with the best intentions, you might run into a few snags. Here’s how to handle them:
- Bit Wandering: This happens when the bit slips on the smooth concrete surface. To fix it, start drilling at a much slower speed to create a small indentation before increasing speed. You can also use a center punch to create a small divot where you want to drill.
- Drill Not Making Progress: This usually means the bit is dull, you’re not applying enough pressure, or you’re not in hammer drill mode. Check your bit’s sharpness, ensure you’re using steady pressure, and confirm the hammer action is engaged.
- Overheating Bit: If the bit gets too hot, it can lose its hardness and become less effective. Pull the bit out periodically, let it cool, and consider using a little water.
- Concrete Cracking: While less common with pilot holes, large or poorly placed pilot holes can sometimes cause minor cracking, especially near edges. Ensure you’re not drilling too close to the edge of the concrete slab or wall. For very sensitive areas, consider using a standard drill without the hammer function for the pilot hole, or opt for a lower hammer setting if your drill allows.
When to Use a Rotary Hammer vs. a Hammer Drill
Both tools are designed for drilling into masonry, but they differ in power and mechanism. Understanding this difference can help you choose the right tool for the job, making pilot drilling even more effortless.
| Feature | Hammer Drill | Rotary Hammer |
|---|---|---|
| Mechanism | Uses cams to create a hammering action. | Uses a piston to create a more powerful, pneumatic hammering action. |
| Power | Good for light to medium-duty concrete drilling. | Significantly more powerful, ideal for heavy-duty drilling, chiseling, and demolition. |
| Drilling Speed | Slower for concrete compared to a rotary hammer. | Much faster drilling, especially for larger holes or harder concrete. |
| Vibration | Moderate vibration. | Can have higher vibration, but often more controlled due to the piston action. |
| Best for Pilot Holes | Excellent for most pilot hole applications. | Overkill for most small pilot holes, but very efficient if you have many to do or are drilling into very hard concrete. |
For the average homeowner needing to drill a few pilot holes for anchors or small fixtures, a good quality hammer drill is perfectly adequate and often more user-friendly. If you’re a professional contractor or frequently work with concrete, a rotary hammer will be a significant time-saver and a more robust tool for various tasks.
Safety Standards and Resources
Working with power tools, especially for masonry, requires an understanding of safety best practices. Organizations like the Occupational Safety and Health Administration (OSHA) provide valuable guidelines for tool safety and dust control. For instance, OSHA’s guidelines on controlling dust are crucial when working with concrete, as silica dust can pose a serious health risk.
Additionally, resources from tool manufacturers and industry associations often offer detailed user manuals and safety training materials. Always familiarize yourself with the specific safety features and operating instructions for your particular drill and bits. The National Institute for Occupational Safety and Health (NIOSH) also offers extensive information on protecting yourself from crystalline silica exposure.
Frequently Asked Questions (FAQs)
Q1: What is the most important thing to remember when pilot drilling concrete?
A1: The most important thing is safety. Always wear safety glasses, a dust mask, and gloves. Ensure your drill is in hammer mode and use a sharp masonry bit. Keep the drill perpendicular to the surface and let the tool do the work.
Q2: Can I use a regular drill for pilot holes in concrete?
A2: No, a standard drill without a hammer function is generally not effective for drilling into concrete. It will be very slow, may overheat the bit, and won’t effectively break up the concrete material. You need a hammer drill or a rotary hammer.
Q3: How deep should a pilot hole be?
A3: The depth of your pilot hole should typically be slightly deeper than the length of the fastener or anchor you plan to use. Always check the manufacturer’s recommendations for the specific fastener, as this ensures proper engagement and holding power.
Q4: What happens if my pilot hole is too small?
A4: If a pilot hole is too small, it can make it very difficult or impossible to insert the fastener or anchor. It can also strip the threads of the fastener or, worse, crack the concrete as you try to force it in.
Q5: How do I prevent dust when drilling concrete?
A5: While some dust is inevitable, you can minimize it by using a dust collection attachment on your drill, periodically pulling the bit out to clear the hole, and using a vacuum cleaner to suck up dust as you drill. A light mist of water can also help suppress dust, but be mindful of electrical safety.
Q6: How often should I replace my masonry drill bits?
A6: Masonry drill bits, especially carbide-tipped ones, will eventually wear out. You’ll notice increased drilling time, overheating, or the bit starting to “skip” or skate on the surface. Replace bits when they show signs of dullness or damage to ensure efficient and safe drilling.
Q7: Can I use a hammer drill for tasks other than drilling holes?
A7: Yes, some hammer drills can be used for light demolition or chipping tasks when paired with a chisel bit. However, for significant demolition, a dedicated rotary hammer with chiseling functions is much more effective and durable.
Pilot drilling concrete is a fundamental skill that opens up a world of possibilities for mounting, securing, and creating in your home or on a job site. By following these steps, using the right equipment, and prioritizing safety, you can achieve clean, accurate pilot holes with confidence. Happy drilling!